Teaching Principles of Photochemistry
by Glen D. Lawrencea and Stuart Fishelsonb
a Chemistry Department and b Media Arts Deparment
Long Island University, 1 University Plaza
Brooklyn, NY 11201
Last Updated: September 24, 1999
Introduction
The cyanotype process was developed by Sir John Herschel in the early 1840's [1]. In the 1870's the process was used for making blueprints and commercial paper became available for marketing to engineers, architects and draftsmen to copy drawings because it resulted in a chemically stable, permanent print. Blueprints are still made today by this technique because it is less expensive than newer technologies. However, as the prices for digital technologies come down, we may see cyanotype blueprints disappear along with the typewriter and stereoscope. Toward the end of the 19th century, cyanotype printing became popular among amateur photographers because of its simplicity and low cost, although the serious photographers shied away from the bright blue color that was produced by this process [2, 3].
To make a cyanotype print, the paper is first treated with a sensitizer solution containing a mixture of ferric ammonium citrate and potassium ferricyanide. After completely drying the paper, it's exposed to ultraviolet light, which causes some reduction of the ferric (Fe(III)) salts to ferrous (Fe(II)) to produce a pale blue image from formation of what is believed to be insoluble ferrous ferrocyanide. The photochemistry of this reaction has been studied by Abrahamson et al. [ 4 ]. Because the image appears as the paper is exposed to UV light (without having to develop it), this is known as a printing out process. After sufficient exposure, the paper is washed in water to remove the soluble unexposed salts. Upon drying, the image darkens as a result of slow oxidation in air, forming ferric ferrocyanide (iron(III) hexacyanoferrate(II), Prussian Blue) [ 5 ]. This blue pigment is practically insoluble in water. This stable blue pigment has been used for printing ink, paint pigment, typewriter ribbon, and carbon paper [ 6 ]. Treatment with oxidants, such as hydrogen peroxide or potassium dichromate, produces a darker blue (almost black) image. Washing in ammonium hydroxide solution results in some loss of the color (the pigment dissolves in the solution and so washes out of the paper permanently).
The cyanotype process is convenient to use for a demonstration of photographic
processes because it is possible to work with this photographic material
in visible light in a room with windows or a room lit with incandescent
light. Fluorescent lighting and direct sunlight have sufficient ultraviolet
radiation to catalyze the chemical changes that take place in formation
of the image on paper.
It is most convenient to make contact prints, so the print will be
the same size as the negative used to make the photographic image. Large
format (5 x 7 in or 13 x 18 cm) black and white negatives, if available,
work best. Objects can also be placed on the paper to produce an image,
such as stencil for lettering, keys, sunglasses, jewelry, etc. Negatives
can be created by drawing with black marker on acetate sheets or cutting
out images (silhouettes) in paper. The procedure described here can also
be used to demonstrate the efficacy of sunscreens with different SPF (sun
protection factor) ratings.
1. Gernsheim, H; Gernsheim, A. The History of Photogaphy, McGraw-Hill, New York, 1969 p.168-169. Sir John Herschel presented his findings to the Royal Society on June 16, 1942 in a paper entitled, "On the Action of the Rays of the Solar Spectrum on Vegetable Colors, and on Some New Photographic Processes."
2. Crawford, W. The Keepers of Light: A History & Working Guide to Early Photographic Processes, Morgan & Morgan, Dobbs Ferry, NY, 1979, pp.67-68.
3. Luna, N. Photographic, March 1992, 78-81.
4. Abrahamson, H.B.; Rezvani, A.B.; Brushmiller, J.G. Photochemical and Spectroscopic Studies of Complexes of Iron(III) with Citric Acid and Other Carboxylic Acids, Inorg. Chim. Acta, (1994), 226, 117-127.
5. Crawford, W., op. cit., p. 163-166.
6. The Merck Index, 9th Ed., Merck & Co.,
Inc., Rahway, NJ, 1976, p 523.
Chemistry for the Sensitizer Solution
Solution A: Dissolve 20 g ammonium ferric citrate (ammonium iron(III) citrate, [1185-57-5]) in 100 mL deionized water. Store in a brown bottle and in the dark. This solution can be stored for about 1 week. It will often grow mold on the surface. When mold appears, discard the solution.
Note: Ammonium ferric citrate is available from many, but not all chemical
suppliers in green and brown forms; the green form works best. They differ
slightly in their ratio of NH3 to Fe (See the Merck Index).
This chemical is relatively nontoxic, and has been used in veterinary medicine
for iron deficiency anemia in cats (see Merck Index, 11th edition). Suppliers
include: J.T. Baker, Fluka, and Spectrum.
Solution B: Dissolve 8 g potassium ferricyanide (potassium hexacyanoferrate(III),
[13746-66-2]) in 100 mL deionized water. Store in a brown bottle and in
the dark. This solution will last at least a month in the dark. This chemical
should not be ingested and should not be mixed with strong acids; it may
liberate HCN (hydrogen cyanide gas) in strong acid solutions.
Sensitizer Solution: Pour equal amounts of solution A and solution B (e.g., 10 mL each) in a beaker and mix well just before applying to the paper. Mix only small amounts at one time. Twenty mL of the mixture should cover many (perhaps >20) sheets of paper, depending on the size. Use a fine bristle brush or an inexpensive sponge brush to spread this mixture as evenly as possible on a sheet of good quality artist paper (see below). It is important to get a coating as evenly as possible for a good quality print. Spread the solution first in one direction, then spread again at a right angle to the first direction, then spread a final time in the first direction. This should ensure an even distribution of the sensitizer solution. Dry the treated paper thoroughly before placing a negative on the paper. These chemicals will destroy the silver emulsion in a negative and permanently stain the negative.
Paper: A good quality artists drawing paper with vellum finish, water color paper with a fine texture, or print making paper work best for this process. Art supply stores carry several different brands, such as Arches, Fabriano, Rives, or Strathmore. Use 90 lb. (175 to 200 g/m2) paper with 100% rag content and cut sheets to a size at least as large as the negatives being used. If silhouettes or objects are going to be used to create an image, select a paper size that is suitable for these objects. Most papers contain sizing, which is recommended. The sizing is usually applied to the side of the paper from which you read the manufacturer's stamp. Apply the sensitizer to this side of the paper.
Negatives: Students can use any black and white negatives, but this is a contact printing process, so the print image will be the same size as the negative. Color negatives do not work well, but students may be encouraged to try color negatives and attempt to explain the reasons for their lack of success. Keep in mind the color negatives work in the color process because they absorb visible light, although most dye pigments absorb UV light, so all color pigments will likely absorb the activating UV light. Professional photographers often have large format negatives (e.g., 5" x 7"). It is possible to enlarge negatives with modern digital technology, consult a department of photography for details or see the Bostick & Sullivan [http://www.bostick-sullivan.com/techrigh.htm] web site for information on making large format digital negatives. Alternatively, students can create their own negative using black felt tip markers on clear acetate sheets. This will usually be just line drawings, but they may wish to experiment with shading.
It is possible place solid objects such as keys, rings, leaves or other botanical forms on the sensitized paper before exposure to the UV light. Paper cut-outs or stencils can be placed on the sensitized paper to create an image or to write a message for greeting cards, etc. Make sure the objects, such as leaves, lettering stencil or paper cut-outs are pressed tightly to the sensitized paper or the resulting photographic image may become blurred. Students may prefer to experiment with blurred images for artistic effect.
Exposure: Place negatives with the glossy side up on top of the thoroughly dried, sensitizer treated paper (yellow side up or toward the UV source). If using sunlight for exposure, place this on a board or other flat, easily portable surface. Place a sheet of 1/4" plate glass (see below) on top of the negative to hold it in place during exposure. The assembled negative or objects, sensitized paper and pressing glass should be covered with cloth or UV opaque material when moving it into the sunlight because the exposure may occur rapidly; in as little as 15 sec with intense sunlight. The length of time for exposure in sunlight will vary from 15 sec to several (20 or more) minutes, depending on season, latitude, cloud cover, time of day, etc. This is a printing out process, so it is possible to watch the exposed paper change from bright yellow to a medium or dark blue color. If using a light box (described below), the exposure time will be about 6 to 8 minutes with 25 watt bulbs at about 2 to 3 inches (5 to 8 cm) from the surface of the paper.
Making a Simple Paper and Negative Holder: Use a piece of masonite, black museum board or other smooth, flat, dark (nonreflective), material to hold the paper flat. Pres-On® Premier black polystyrene self-adhesive board can be stuck together (sticky surface to sticky surface) to create a double thickness board for this purpose. Pres-On® Premier board can be obtained from Light Impressions (www.lightimpressionsdirect.com) in 8" x 10", 8" x 12", 11" x 14", and 16" x 20" sizes (catolog nos. 7856, 7857, 7858 and 7859, respectively). Have a piece of 1/4" thick plate glass cut to a size just smaller than the masonite or museum board backing. Tape one edge of the plate glass to one edge of the masonite or museum board to create a hinge. Gaffer's tape or duct tape work well for this purpose. With the plate glass folded back at the hinge, students should place the sensitized paper (treated side up) on top of the masonite/museum board, place negatives on the thoroughly dried paper (glossy side up), and close the plate glass over the paper and negative to hold them firmly in place before uv exposure. This works well to hold the negative or other flat objects, such as paper cut-outs in place during exposure. If students are using direct sunlight for exposure, they can place a dark cloth or piece of cardboard over the glass to prevent exposure while they are carrying this assembly into the direct sun (usually out doors).
Washing the Prints: Wash the prints thoroughly with running tap water for about 10 to 20 min to remove any unexposed sensitizer solution. The blue color will remain where the paper was exposed to UV light. The Prussian blue pigment is extremely stable and will last many years. The image will darken some as it is exposed to the air (oxidation).
Modifying the Print: If the image is too dark, or if the white regions are fogged with blue color, some of the pigment can be washed out of the paper with dilute (0.2 M) ammonium hydroxide solution. It is also possible to use diluted clear household ammonia (dilute 1:20 with water). Place the paper in a tray or wash basin containing the ammonium hydroxide solution for a few seconds, then remove immediately and wash thoroughly with tap water. The Prussian blue pigment is not stable in alkaline medium and washes out of the paper. Do not allow the paper to remain in the ammonium hydroxide solution for more than a few seconds at a time or too much pigment may be wahed out, resulting in a disappointing image. Be sure to thoroughly wash the paper immediately with running water to remove all of the ammonium hydroxide solution..
If a darker tone is preferred, the washed paper can be placed in 3% hydrogen peroxide solution (in a separate tray or wash basin) for about 10 to 30 sec, then remove the paper and wash thoroughly in running tap water for 10 to 20 min. After the paper is thoroughly washed, it can be dried to give a permanent print. The chemical reaction taking place that results in darkening of the pigment is not documented (to our knowledge). See Mike Ware's web site for the "New Cyanotype" process.
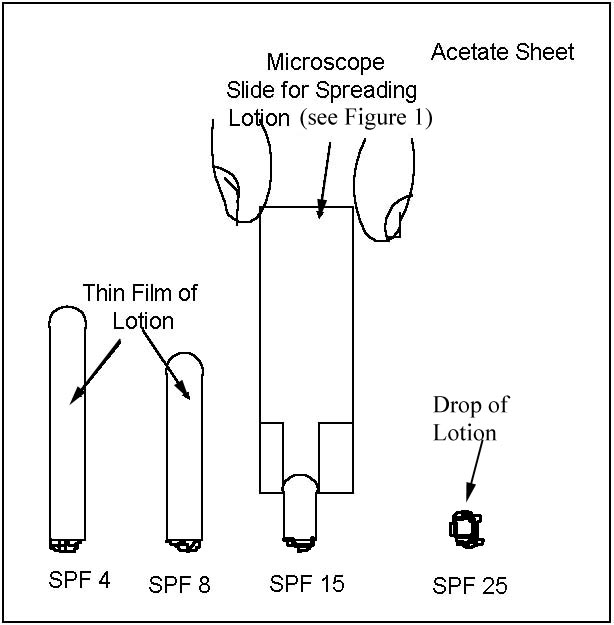
Testing Sunscreens: This is an interesting
method for testing sunscreens because it gives a permanent record of the
test. Sunscreens with different sun protection factors (SPF) can be spread
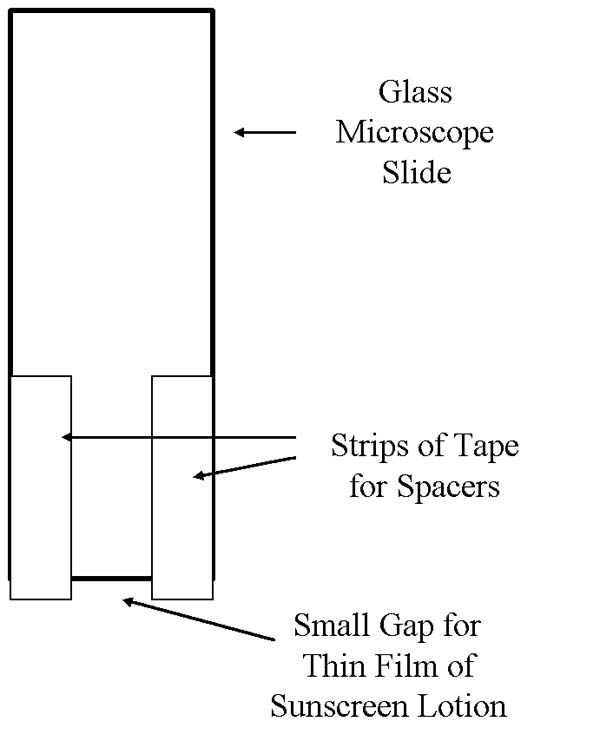
as a thin film on clear acetate sheets or a pane of glass. It is necessary
to have uniform film thickness in order to compare SPF and brands. It is
possible to get very uniform film thickness using a glass microscope slide
that has pieces of cellophane (e.g. Scotch) tape adhered to two sides of
one edge of the slide, leaving a narrow gap between the pieces of tape
(see Figure 1). Experiment with using 2 or 3 thicknesses of cellophane
tape
to get a suitable film thickness of lotion for testing. A felt marker can
be used to write on the glass or acetate to label each sunscreen film.
The label will be recorded on the photographic image for a permanent record.
A diagram illustrating the technique for spreading sunscreen lotions on
sheets of acetate or glass is shown in Figure 2.
|
|
|
| Figure 1. Illustration of Microscope Slide with Tape Strips for Uniform Spreading of Sunscreen Lotions. | Figure 2. Illustration for Spreading Sunscreen Lotion on Acetate Sheets or Glass. |
Construction of a Light Box: The main
features of a light box are fluroescent lights with adequate uv output,
ballasts to illuminate the light tubes, a fan for cooling, and a platform
for exposure of the photographic materials. The box can be constructed
of any durable material; old computer cabinets were found to serve the
purpose when two equal-sized hoods are connected together. The overall
dimensions of the box should be about 55 cm (22 in) wide, 15 to 20 cm (6
to 8 in) high and 40 cm (16 in) deep. A (10 cm) 4 in muffin fan works well
for cooling, and the platform should be mounted on rolling drawer guides
for easy arrangement of the negatives on the photographic paper. The fluorescent
lights should be 18 in, 25 watt (GE F25T8/BL or equivalent) black light
(uv) tubes. Two-bulb ballasts rated for the bulbs you are using are large
and and heavy, but work well. Alternatively, ballasts for single bulbs
can be used. Longer bulbs may be used, but will require a larger box and
compatible ballasts. Fluorescent bulb sockets (two per bulb) are relatively
inexpensive, but also must be appropriate size for the bulbs being used
(those above have 1 inch diameter). See Figure 3 for diagram of light box.
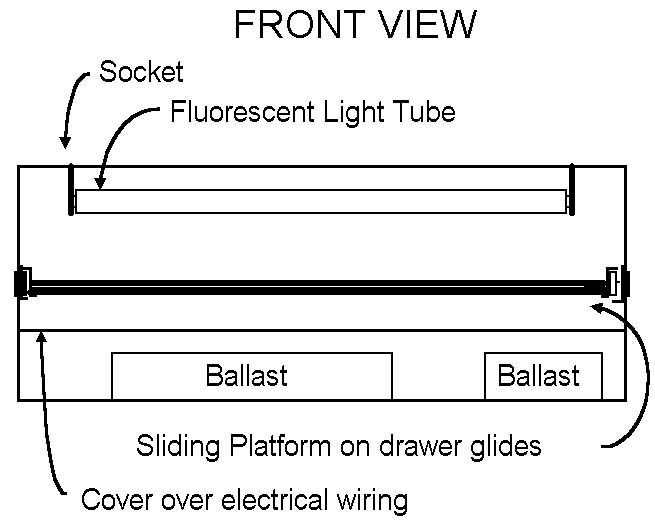 |
| Figure 3. Diagram of Light Box (ballast at bottom) |
Ballast at the Bottom Light Box Design
Two identical hoods 53 cm x 38 cm x 13 cm (21 in x 15 in x 5 in) from old (286) computers were bolted together to form a box with dimensions 53 x 38 x 26 cm (21 in x 15 in x 10 in). Fluorescent sockets (Leviton 13053-UN) were mounted in two rows at 44 cm (17.25 in, actual length of fluorescent bulbs) apart along the top of the box. The distance between sockets in each row is 4 cm (1.5 in) on center, resulting in the bulbs being 4 cm apart. The box described here will accomodate 8 bulbs. A larger box can be used, which will accomodate more bulbs. Two bulb ballasts (Advance R-2P825-TP for 25 watt bulbs) can be mounted to the bottom of the box and the wires connected to the sockets in the appropriate manner. Each ballast must be connected to a 120 volt power source. A connector strip is found to be useful for making these connections.
Metal drawer guides (38 cm, 15 in) can be purchased from a hardware store. These should be mounted about 12 cm (4.5 in) from the top of the box, giving about 10 to 12 cm (2 to 2.5 in) clearance between the sliding shelf and the light bulbs. Plexiglass or plywood can be used to make the shelf that is mounted to the drawer guides and should be cut to the proper dimensions to fit inside the box and span the gap between the drawer guides mounted on each side of the box. Note: you should have the ballast wires sandwiched between the drawer guides and the sides of the box so they do not interfere with the sliding of the shelf. Use a piece of 1/4" plate glass to hold paper and negatives flat and in place during uv light exposure.
The back of the box should be covered; light weight museum board or foam core is sufficient, or a sheet of metal will also work. A hole for a 10 cm (4 in), 120 V muffin fan should be made in the backing to allow the fan to draw air out of the box. The muffin fan can be mounted securely to the box with brackets and is connected to the 120 volt wire connecting strip that is used to power the ballasts. In addition, a power cord with optional switch should be connected to the wire connecting strip to provide power for the ballasts and fan.
The sliding shelf should be mounted so it is flush with the front of the box. The front of the box should have 3 panels covering it. The upper panel along the front should be about 8 cm (3 in) extending down from the top edge of the box and secured to the box. The lower panel along the front should be 8 to 10 cm (3 to 4 in) wide extending up from the bottom edge of the box and secured to the box. The sliding shelf should have a panel fastened to the front edge of the shelf that is about 8 to 10 cm (3 to 4 in) wide, such that the top of this panel overlaps the top front panel and the bottom will overlap the bottom front panel. This panel is secured to the front edge of the sliding shelf and will be outside the top and bottom panels so the sliding shelf can be pulled out.
Ballast at the Top Light Box Design
A piece of 3/8" or 1/2" (1.0 to 1.3 cm) plywood can be cut to fit inside
the box and use steel L-brackets to hold the plywood shelf in place at
about 8 cm from the top. The light sockets sockets (Leviton 13053-UN)
are mounted on one side of the plywood sheet (this will be the bottom)
in two rows at 44 cm (17.25 in, actual length of fluorescent bulbs) apart,
with the distance between sockets in each row being 4 cm (1.5 in) on center.
The ballasts can be mounted to the other side of the plywood sheet (this
will be the top) and holes drilled to accomodate the wires connecting the
ballasts to the light sockets. This makes for easy mounting of light
sockets and ballasts on the plywood sheet outside the box and then slide
it into the box when finished. An electric cord with optional switch
should be connected to the connector strip with the ballasts. The
fan can also be connected as described above. The metal drawer guides
are mounted near the bottom of the box with enough clearance to allow easy
movement of the sliding shelf. In this way the wiring for the ballasts
does not interfere with the drawer guides and the ballasts and sockets
are mounted on one plywood sheet for easy installation.
 |
| Figure 4. Diagram of Light Box (ballast at top) |
Total cost for the materials (sockets, ballasts, light bulbs, fan, wiring, switch) is less than $100 if a suitable box can be found. Prebuilt boxes, chemicals for cyanotype process and other supplies are available from Palladio.
Useful Websites for Cyanotype Photography and UV Damage
http://www2.ari.net/glsmyth/articles/cyano.htm
http://www.mikeware.demon.co.uk/cyano.html
http://duke.usask.ca/~holtsg/photo/faq.html#Cyanotype
http://uvb.nrel.colostate.edu/UVB/uvb_resources.html